Livin' and Learnin'

The Life and Times of Miss Dana

Cruise Packing Tips part 1

It’s almost time for us to cruise again! This time we are going on a seven day Eastern Caribbean cruise. It will be our first seven day cruise and our first trip to the Eastern Caribbean so we are both really excited. I love cruising but I HATE packing for it! A few years ago, I figured out that I must make a list or surely I will forget something. I’ve also learned what I need to take and what can stay at home. I try to keep the packing under control and limit myself, otherwise I’ll way overpack!

Since there’s only the two of us, I limit myself to one large suitcase (checked in), a garment bag (also checked in and used for dresses and DH’s suit), and a small rolling carry-on suitcase with a Vera Bradley grand traveller bag that will slide onto the handle of the carry on. This provides more than enough room for us to pack everything we need, and still have some room for souvenir purchases that we make while ashore. 🙂

I like to pack sample/travel size items when I can. They can be a real space saver when packing, and because they aren’t returning, there is extra space in the luggage for purchases made while on your trip! Here’s some examples of what I like to pack:

wpid-IMG_2148-2016-08-5-23-201.jpg

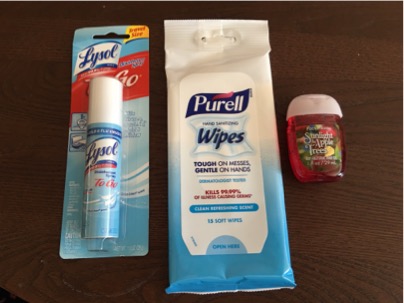
Lysol spray, Purell hand wipes (for before and after eating), and hand sanitizer (Not pictured: Lysol wipes)

Note: always bring some type of air freshener spray. The cabins are close quarters and you don’t want any weird smells in there. Also, no-one wants to catch the norovirus! Always keep sanitizer in your pocket! I like to wipe down counter tops and door handles with the Lysol wipes, and also that stick that moves the curtains back. Imagine how many dirty hands have touched that! I do this a few times during the cruise to keep germs in check!

wpid-IMG_2145-2016-08-5-23-201.jpg

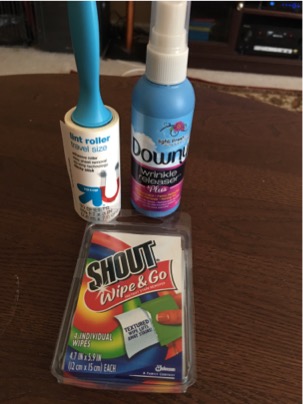
Lint Roller, Downy wrinkle release spray, Shout wipes (not pictured: Tide PODS and dryer sheets)

Quick and easy laundry fixes! I pack a couple of Tide PODS and dryer sheets to use when washing. I know for some, laundry isn’t exactly a “vacation”, but you can save space in your suitcase by washing a quick load of laundry and re-wearing items like socks, t-shirts, undies, etc. I usually just wash one load about half way through the cruise, and one towards the end if we have a sea-day. It saves me a little washing when we get home, too! I’m not sure if all ships have laundry facilities, but I do know that most Carnival ships do.

wpid-IMG_2142-2016-08-5-23-201.jpg

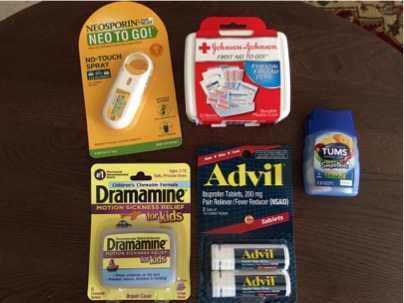
My little pharmacy: Advil, Tums, Dramamine, Neosporin and bandaids. (Not pictured: Immodium)

You never know what might happen, headaches, seasickness, belly pains from eating so much! Pack a little kit to avoid paying the high cruise ship costs for common meds. Also…the medical facility onboard usually gives out sea sickness pills for free.

I use the children dramamine because it is half the adult dose. I take it every morning to prevent sea sickness. If I need more, I feel ok about taking another pill. Check with your doctor to see what’s best for you. Also remember any prescriptions that you need to take!

wpid-IMG_2149-2016-08-5-23-201.jpg

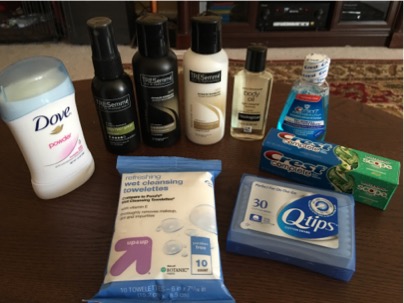
Travel size deodorant, shampoo, conditioner, hair spray, body oil, toothpaste & mouthwash, Q tips, make up remover wipes

What a space saver! Those big bottles of shampoo, etc can really take up space and not to mention they are HEAVY too!

wpid-IMG_2151-2016-08-5-23-201.jpg

Travel size body washes come in so handy! I also pack my own hand soap and plenty of hand sanitizers. (Not pictured: travel size face wash and moisturizer)

Here’s the list of the items in this post, with some that were not pictured:

Lysol spray travel size
Lysol wipes
Downy wrinkle release spray
Lint roller
Tide Pods/Dryer sheets

Prescription medications
Motion sickness pills
Bandaid/Neosporin
Hand wipes/ sanitizer

body wash
shampoo/conditioner
face wash
moisturizer
Hand soap
deodorant
toothbrush/toothpaste

Not pictured:
Sunscreen (VERY IMPORTANT!!!)
Insect repellent (especially when going to Mexico or anywhere that has a Zika virus problem)

After-sun balm/lotion
razor and shaving cream

Stay tuned for Part 2 coming soon!

No Comments »

Jamberry Wraps Application and Removal

I’ve been asked by more than a few how I apply and take off my Jamberry wraps, so I decided to write a step by step blog post showing every step. Hope this helps! 😉

To remove the current wrap, I put some nail polish remover on a cotton ball (not so saturated that it’s dripping, but pretty wet). I sit the cotton ball on the nail then use the little nail clip to hold it in place.

link for clips: http://www.amazon.com/Professional-Durable-Reusable-Plastic-Remover/dp/B00QGQMA5U/ref=sr_1_1?ie=UTF8&qid=1442692773&sr=8-1&keywords=nail+clips

wpid-IMG_6946-2015-09-19-15-55.jpg

Let them stay on for about 3 minutes or so. You can check the status of the wraps as you wish. The Jamberry should be to the point that it slides right off your nail. Use the soaked cotton ball to remove any left over adhesive and base coat.

Next, I apply Sally Hansen Instant Cuticle Remover gel to the cuticles of one hand. Let it sit about 30 seconds or so then use an orange stick to push back the cuticles, then clean with alcohol.

link to cuticle remover: http://www.amazon.com/Sally-Hansen-Instant-Cuticle-Remover/dp/B0046MK34G/ref=sr_1_1?ie=UTF8&qid=1442693015&sr=8-1&keywords=sally+hansen+cuticle+remover

wpid-IMG_7008-2015-09-19-15-55.jpg

Once both hands are complete, use a nail buffer to smooth . I use the one that came in my Jamberry application kit:

wpid-IMG_7009-2015-09-19-15-55.jpg

Next, apply cuticle oil (I use Jamberry Cuticle Oil in the bottle)

wpid-IMG_7011-2015-09-19-15-55.jpg

I generously cover the cuticles and nails too. I let it sit about 2 minutes or so, long enough to let it soak in and soften those cuticles! Then I wipe the nails clean with alcohol and now its time for the base coat!

I use Sally Hansens Maximum Strength, but any base coat will do. My nails tend to be thin so I need the strength. I also like how it dries so fast!

wpid-IMG_0190-2015-09-19-15-55.jpg wpid-IMG_7012-2015-09-19-15-55.jpg

Once this dries, apply the Jamberry using your favorite technique. I use the little Jamberry heater. It makes things so much easier than using a hairdryer!

wpid-IMG_7013-2015-09-19-15-55.jpg

Once they are applied, I use nail clippers to trim off the ends, taking just a little bit of nail with it. That way the tip of the nail is even with the wrap. Others prefer the filing method and that’s ok, too. My nails are too thin to use the filing method, so I stick with the clippers. 🙂

Finished product! 🙂

wpid-IMG_7022-2015-09-19-15-55.jpg

No Comments »

My Newest Hobby

My cousin Stacy had a baby girl in August and that sparked my creative streak. Out of the blue I decided to crochet a baby blanket for her. I went to Joann Fabrics one day after work and bought some yarn and a set of hooks and got busy. I’ve been hooked ever since!

Here’s the blanket I made for little Vivi, my newest cousin:

wpid-IMG_4791-2014-10-6-19-02.jpg

It started as a granny square and I just kept going. It’s the first crocheting that I’ve done in years so I wanted to start off easy. 🙂

And here’s the finished product!

wpid-IMG_4814-2014-10-6-19-02.jpg

I’m still making blankets and I have quite a list, so I better get busy! 🙂

No Comments »

Homemade Jewelry Cleaner (No Scrubbing!)

I’m leaving for a cruise in a few days so I wanted to give my wedding rings a quick cleaning. I could not find my store bought cleaner that I always use, so I took to the world wide web to find a homemade recipe that might work. I have a white gold wedding set, and the hubs has a yellow gold ring, and that’s what’s in this blog post.

You will need:

a bowl (I used glass)

aluminum foil

baking soda

salt

dish soap

hot water

wpid-IMG_4071-2014-03-20-20-293.jpg

First, take a piece of aluminum foil and cut it into a square that will fit in the bottom of the bowl. Place it in the bowl with the SHINY side up, then place the jewelry on top of it.

wpid-IMG_4073-2014-03-20-20-293.jpg

Then add 1 cup hot tap water, 1 teaspoon each salt, baking soda, and dish soap.

wpid-IMG_4075-2014-03-20-20-293.jpg

Give it a little stir just to mix everything up. Then let it sit for 10 minutes.

wpid-IMG_4076-2014-03-20-20-293.jpg

After 10 minutes, rinse each piece well with hot tap water. If there’s any tough dirt, you may want to try a toothbrush to get it. I didn’t have to use the toothbrush and my rings were pretty dirty. 🙂

Pat them dry.

wpid-IMG_4078-2014-03-20-20-293.jpg

And viola!

wpid-IMG_4079-2014-03-20-20-293.jpg

Clean and SPARKLY!

wpid-IMG_4081-2014-03-20-20-293.jpg

White and yellow gold. 🙂

wpid-IMG_4082-2014-03-20-20-293.jpg

No Comments »

Super Low Carb Pizza!

Yes that’s right, LOW CARB PIZZA!!!

The New Year’s Resolution this year for us is to eat low carb. Of course it will help the waistline, but possibly help make us healthier, too! It certainly can’t hurt to try, right? The problem is, the hubby doesn’t particularly care for veggies. At all. So I gotta be tricky with them. And here’s a recipe that passed the picky husband test. He didn’t even know there was a veggie in it until after he finished and he asked me what was in it! 🙂

First let me say that I have no idea of the nutrition information for this pizza. I just know that there’s no bread in it and that works for me!

You will need:

1/2 good size head of cauliflower

1 1/4 cup shredded Mozzarella cheese

2 pinches of shredded Parmesan cheese

1 egg

salt and pepper to taste

1/4 cup tomato sauce, or pizza sauce of your choice

a sprinkle of Italian seasoning

Turkey pepperoni (or regular if you so choose)

First, grate the cauliflower using a box grater.

wpid-IMG_3771-2014-01-7-18-58.jpg

When it’s finished, it should look like this:

wpid-IMG_3772-2014-01-7-18-58.jpg

Put the cauliflower in the microwave for about 5 minutes, or longer if needed, until it’s soft and will mash with a fork. Let cool 3-5 minutes.

Preheat oven to 425 degrees.

After the cauliflower is cool, mix the mozzarella, parmesan, egg, and salt & pepper to the cauliflower. Mix well..

wpid-IMG_3776-2014-01-7-18-58.jpg

This is the “dough”. Spread this on a cookie sheet or pizza pan, but be sure to spray the pan heavily or use parchment paper. I used parchment paper and it worked like a dream.

wpid-IMG_3777-2014-01-7-18-58.jpg

Place in oven for 12-15 minutes, until brown. When you take it out, preheat the broiler on your oven.

wpid-IMG_3778-2014-01-7-18-58.jpg

Then add the toppings of your choice. I used tomato sauce, a sprinkle of Italian seasonings, mozzarella cheese, turkey pepperoni, and a good sprinkle of parmesan cheese.

wpid-IMG_3780-2014-01-7-18-58.jpg

Put it back in the oven under the broiler until the cheese is melted, about 4-5 minutes. And viola!

LOW CARB PIZZA!!!

wpid-IMG_3782-2014-01-7-18-58.jpg

This didn’t take long at all and even passed the picky husband test!

This is certainly going into the low carb recipe mix.

No Comments »

Pinterest Lunchbox Salad

I have seen multiple Pinterest posts about salads in a jar. I thought these are a great idea, especially for work lunches! My work day starts at 6am, which means that I get up around 430am (ugh!). I’m not exactly in the mood to cut up veggies, etc that a salad requires, so salads are not generally what I take to work for lunch. However, I do love fresh veggies and salads so I decided to put those Ball jars sitting in my kitchen to good use. 🙂

wpid-IMG_2350-2013-06-1-11-251.jpg

First, I washed my jars and lids. (of course)

Then I filled my jars, starting with the dressing (bottom layer, I chose a light raspberry vinaigrette).

After the dressing, add whatever veggies you like. (I used broccoli, carrots and cucumber. I considered using onion but I thought it might stink later.)

Next is the cheese (or meat if you want meat).

Finally stuff the lettuce or salad mix of your choice to fill the jar. Stuff it on in there to get as much air out as possible. (I used a Spring mix.)

I made four jars, one for each work day this week. According to the multiple Pinterest posts I’ve seen, they should last 4-6 days in the fridge. I’m hopeful that they will, and I will continue to take these to work for lunch! 🙂

No Comments »

Pinterest Christmas Project #2

For my second Pinterest project, I found a “Christmas Wreath Cake” that seemed pretty easy to do, and it was so cute that I decided to try it out!

You will need a bunt cake pan, one box of white cake mix, a can of white “whipped” icing, red and green food coloring, and your choice of sprinkles.

First, mix the cake mix according to directions. (I’ve always used a blender to mix cake mixes. Put the eggs and oil in first, followed by the cake mix, then the water on top. And blend! Viola! Cake is mixed in a pourable container, too!)

Second, pour 1 cup of cake batter into two cups.

One will be colored with green food coloring, the other with red. The remaining portion will stay white.

wpid-IMG_1654-2012-12-23-14-483.jpg

Next, mix the necessary amount of food coloring into each respective cake batter. It needs to be a solid green and red. No pink! 🙂

wpid-IMG_1655-2012-12-23-14-483.jpg

Give your bunt pan a through coating of Pam, or grease as you like.

Pour about half of the white batter into the greased pan, followed by all the red, then all the green batters. Finish off by pouring the remained of the white batter. DO NOT MIX, just layer one over the other.

wpid-IMG_1656-2012-12-23-14-483.jpg

wpid-IMG_1657-2012-12-23-14-483.jpg

(The bubbly yellow stuff is the Pam)

Now, bake according to the box directions, and cool throughly.

wpid-IMG_1661-2012-12-23-14-483.jpg

For the icing:

Divide a can of white whipped icing in half. Use green food coloring to color one of the halves. Leave the other half white.

Put the icings in the microwave for a few seconds, just until it gets a little thin. Alternate drizzling the green and white icing over the cake, letting the drizzle collect on the cake plate. Once all the icing is used, cover the cake with the sprinkles.

wpid-IMG_1659-2012-12-23-14-483.jpg

Finished product:

wpid-IMG_1664-2012-12-23-14-483.jpg

View of the top:

wpid-IMG_1666-2012-12-23-14-483.jpg

According to the Pinterest page I read, when the cake is cut, there will be a swirl or layering of the red, green and white cakes. I can’t cut it now because it’s going to my Maw-In-Law’s house for Christmas, but I’ll be sure to get a pic once it’s cut!

UPDATE:

The cake was a hit, and it went fast. I was able to get a pic when it was cut, and this is how the center turned out…

wpid-IMG_1677-2012-12-23-14-482.jpg wpid-IMG_1676-2012-12-23-14-482.jpg

All in all, I am pleased with the look and taste of the cake and I will surely make it again.

Merry Christmas!!!

No Comments »

Christmas Project from Pinterest #1

I saw a variety of Christmas trays made from Starlight Mints on Pinterest, and I absolutely loved them! I thought it wouldn’t be too difficult to make, so why not give it a try?

Preheat the oven to 350 degrees.

Unwrap the mints (I used Publix brand Starlight Mints. They were the only ones that I could find a week before Christmas.)

wpid-IMG_1582-2012-12-20-15-23.jpg

Ok, The next step is a very important one according to other bloggers on Pinterest. PUT PARCHMENT PAPER ON A COOKIE SHEET. If you do not use parchment paper, the candy will be forever stuck to your cookie sheet!

Arrange the mints into the desired shape. (I wanted a circle.)

wpid-IMG_1583-2012-12-20-15-23.jpg

Bake at 350 for 8-10 minutes. (I baked mine for 10)

When you take the candy out, it’s not runny, but tacky and HOT. Be very careful!

wpid-IMG_1584-2012-12-20-15-23.jpg

Mine did not create a circle to my over achiever’s compulsive standards, so I decided to make a bowl! A candy bowl, haha!

So I cut the parchment paper around the candy and left about an inch extra around so I could use it to move the candy. I put a small glass bowl upside down on the counter and slid the candy over it and used the parchment paper to mover the candy into the shape of a bowl.

wpid-IMG_1589-2012-12-20-15-23.jpg

I let it cool for about 25 minutes. And here is the finished product:

wpid-IMG_1591-2012-12-20-15-23.jpg wpid-IMG_1595-2012-12-20-15-23.jpg

Ok, so it isn’t perfect, but I could put wrapped candy in it at least. I was my first try, after all. 🙂

But, I did learn what tweaking needs to be done for next time!

Merry Christmas y’all!

And Thanks Pinterest!

2 Comments »

Pumpkin & Peanut Butter Dog Treats

When Maddux was a pup, he had terrible belly problems. We tried everything we could think of to help him, and the solution was PUMPKIN! It was certainly a belly-helper for our buddy and quite a relief to us, too. We learned that pumpkin is great for digestive problems in dogs and cats, too. It’s also good for weight control. It seems to be the “perfect” supplement to our dog’s diet.

Mike found some organic pumpkin canned and processed especially for dogs on Amazon. We ordered it by the case! It worked wonders for Maddux for several months (one heaping spoonful every morning), but one day out of the blue, he decided that he didn’t want the pumpkin, and that was the end of the pumpkin breakfasts.

Which leads me to today, when there are still four cans of pumpkin that need to be used. What to do??? I searched for recipes for dog treats that include pumpkin and I found one on allrecipes.com that I decided to give a try. I read several of the reviews and tweaked the recipe to allow for items that I already had in the pantry.

My recipe for Pumpkin & Peanut Butter Dog Treats:

wpid-IMG_0629-2012-07-9-12-503.jpg

2 1/2 cups Whole Wheat flour

2 eggs

1 cup canned pumpkin

2 heaping spoonfuls peanut butter

1/2 teaspoon ground cinnamon

water (as needed)

Directions

Preheat oven to 350 degrees F (175 degrees C).

Mix together the flour, eggs, pumpkin, peanut butter, and cinnamon in a bowl. Add water as needed to help make the dough workable, but the dough should be dry and stiff.

(I used a stand mixer with the dough hook and had no problems. I would imagine a hand mixer with beaters may be difficult to use. This is a heavy, thick dough.)

Roll the dough into a 1/2-inch-thick roll. Cut into 1/2-inch pieces.

wpid-IMG_0630-2012-07-9-12-503.jpg

Bake in preheated oven until hard, about 35 minutes.

wpid-IMG_0631-2012-07-9-12-503.jpg

I also tried cutting them into strips with a pizza cutter, after all, this is an experiment. 🙂

wpid-IMG_0633-2012-07-9-12-503.jpg

*Note: I baked them for 30 minutes then checked them. They were certainly done, but not as hard as I would’ve liked them, so I put them in for an additional 5 minutes and they were perfect. I would recommend 35 minute bake time at 350 degrees. (The original recipe called for 40 minutes.)

Finished product:

wpid-IMG_0634-2012-07-9-12-503.jpg

The “strips” came out GREAT! I think Maddux likes them better because he can hold on to them while he eats them. 🙂

When I gave one to Maddux he ran away from me and hid to eat it. Yep. It’s a goodie! haha!

wpid-IMG_0636-2012-07-9-12-503.jpg

All in all, these were pretty easy to make, and they make the house smell like pumpkin pie! I will certainly be making more of these for Maddux! Dog tested, Mama approved! haha!

No Comments »

My “Urban” Garden

I am so excited tonight! My hubby and I went to Home Depot to get a few things, and as we were walking in I told him that next year I want to build a raised garden for our backyard. He chuckled. Here’s why…we live in a townhouse, in the suburbs of Atlanta. There’s no room for a garden of any sort in our 100 sq ft backyard. haha

As we were walking through the store, we came across a plastic box under a sign that said, “City Pickers Patio Garden Kit”. I was so excited and I got it…I have never had a full garden, so I think this is a good way to break me in, and as an added bonus, it fits in our little urban backyard!

My current “garden”…three pepper plants…red, yellow, and green bell peppers.

wpid-IMG_0356-2012-04-17-15-07.jpg

My new garden box, a few plants, and my “helper” in the bottom of the pic.

wpid-IMG_0354-2012-04-17-15-07.jpg

wpid-IMG_0358-2012-04-17-15-07.jpg

There’s one tomato, one watermelon, eight sweet potatoes, one banana pepper, and one cucumber plants in the garden. I’m really excited and I hope this garden is fruitful for us!

My “helper” is pleased as well. He sniffed everything out and gave his seal of approval. 🙂

7-9-12 UPDATE

The garden continues to grow, however I think I made poor decisions when choosing plants for it. This is my first “garden”, after all and I really didn’t know what I was doing.

So…the tomato plant is a tall stalk with small leaves. 🙁

The sweet potatoes are very long stalks with many leaves (I think they are crowding out the rest of the plants.)

The watermelon and cucumbers are very long vines, hopefully they will produce something.

The big surprise was the banana pepper! I have harvested one pepper and there is another one growing!

wpid-IMG_0608-2012-04-17-15-07.jpg

No Comments »